How to Check Your Homepage for ADA Accessibility Issues
83.9% of homepages fail color contrast alone. Use this 8-step checklist to find ADA accessibility issues on your homepage yourself, no developer needed.

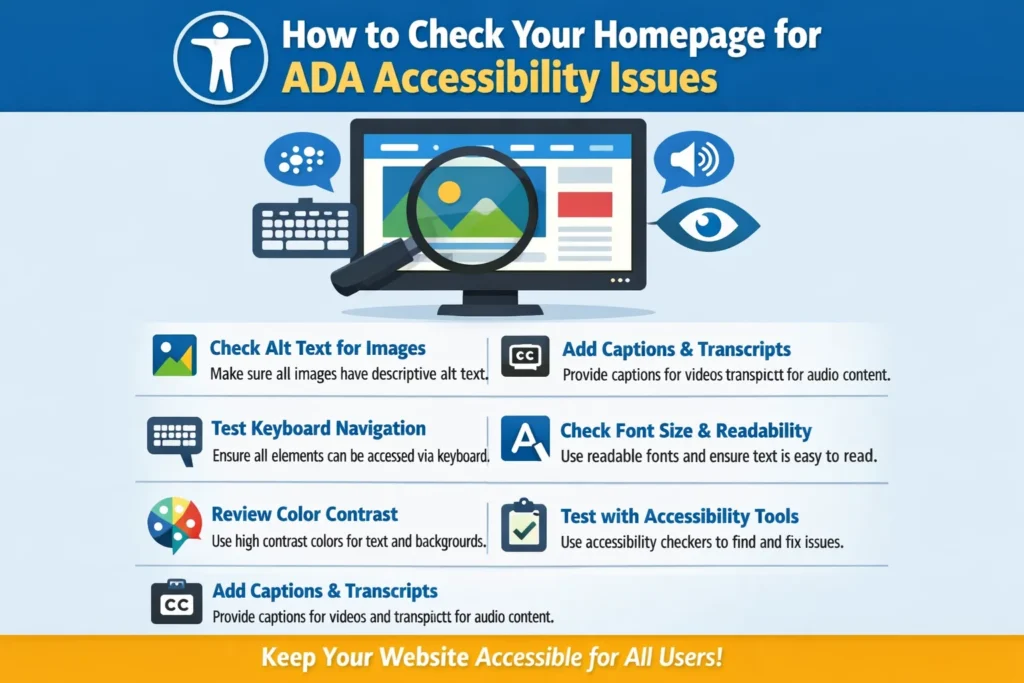
The average homepage contains 51 distinct accessibility errors. According to the 2026 WebAIM Million report, the trend reversed in 2026: both the number of detected errors and the proportion of pages with WCAG conformance failures increased after years of gradual improvement.
Most guides tell you to “run a scan.” What they skip is everything else: why you start with the homepage, what you check before the scanner runs, and what the scan results actually mean once you have them. This article fills those gaps.
By the end, you will have a concrete eight-step homepage accessibility checklist you can work through yourself, a plain-English guide to reading scan output, and a clear answer to how often this needs to happen.
Why Your Homepage Is the Right Page to Check First
Starting with the homepage is not a convenience choice. It is the highest-traffic page on your site, which means it is the page where the most users with disabilities encounter barriers. It is also the page most commonly cited in ADA demand letters. Navigation links, hero images, and header elements appear as exhibits in complaints with regularity.
According to UsableNet’s 2025 Year in Review, approximately 3,117 federal web accessibility lawsuits were filed in 2025, a 27% increase over 2024. Including state court filings, total cases exceeded 5,000. Demand letters overwhelmingly target small and mid-sized businesses, because smaller sites tend to have more compliance gaps and a higher settlement likelihood.
Fixing your homepage is the highest-return remediation action you can take per hour of effort. A homepage with significant errors signals systemic risk across your entire site. If your navigation, hero image, and primary CTA fail basic checks, your interior pages are likely in worse shape. The homepage check gives you a fast, accurate read on where you stand.
Content and design updates introduce new errors constantly. A homepage that passed a check six months ago may not pass today, especially after a plugin update, a seasonal redesign, or a new section added by a staff member without accessibility on their checklist.
What a Homepage ADA Accessibility Check Actually Covers
Definition: A homepage ADA accessibility check is a review of your website’s front page to identify features that block users with disabilities from navigating, reading, or interacting with your content. It covers color contrast, image descriptions, keyboard navigation, form labels, heading structure, and interactive elements: the issues that ADA lawsuits and demand letters most commonly cite. The legal standard courts apply is WCAG 2.1 Level AA, as confirmed by DOJ guidance on web accessibility and the ADA.
ADA Title III applies to private businesses open to the public. It has no government-mandated compliance deadline for websites. Enforcement is lawsuit-driven, not regulatory. There is no agency checking your site on a schedule. What exists instead is a plaintiff’s bar that actively scans for WCAG failures and sends demand letters when they find them.
For the deeper legal framework, including how courts have interpreted Title III and what the DOJ guidance actually says, the ADA website compliance guide covers that ground. This article stays focused on the homepage check itself.
A homepage check does not cover your full site. Interior pages, checkout flows, and product pages each carry their own risk profile. This checklist is the right starting point, not the finish line.
The Homepage Accessibility Checklist: 8 Checks Any Owner Can Do
Each step below includes the exact action, what passing looks like, what failing looks like, and what the consequence is. Work through these in order. Steps 1 through 3 take under ten minutes. Steps 4 through 8 require another fifteen to twenty minutes of focused review.
Step 1: Run a Free Automated Scan
Go to your homepage and run it through a free ADA compliance checker to get your baseline error count. The scanner reads your page’s HTML and flags WCAG failures automatically.
Pass: Fewer than ten errors flagged, with no critical issues in the Errors tier.
Fail: Ten or more Errors, especially if they include missing alt text, empty buttons, or missing form labels.
Consequence: Errors are confirmed WCAG failures. Any of them can appear in a demand letter. The scan gives you a prioritized list to work from. Without it, the manual steps below have no reference point.
Keep the scan results open as you work through the remaining steps. The manual checks will confirm and contextualize what the scanner found.
Step 2: Check Color Contrast on Text, Links, and Buttons
Look at your homepage in a normal browser window. Focus on three areas: your body text, your navigation links, and your primary call-to-action buttons.
Pass: Dark text on a light background (or light text on a dark background) with a contrast ratio of at least 4.5:1 for normal text and 3:1 for large headings (18pt or 14pt bold).
Fail: Light gray text on a white background. Pale placeholder text in search fields. “Ghost” buttons: outline-only buttons with low-contrast text inside.
Consequence: According to the 2026 WebAIM Million report, low-contrast text appears on 83.9% of homepages, up from 79.1% in 2025, making it the single most common accessibility failure for the seventh consecutive year. It is a WCAG 1.4.3 failure and a frequent exhibit in ADA complaints. Users with low vision may not be able to read your navigation or complete a purchase.
If your scanner flagged contrast errors, note exactly which elements were cited: body text, link color, or a specific button. That tells you where to focus.
Step 3: Inspect Every Image for Alt Text
Right-click each image on your homepage and select “Inspect” to open the browser developer tools. Find the <img> tag for that image and look for an alt="..." attribute (the text description attached to the image).
Pass: Every meaningful image has a descriptive alt attribute. Your hero image (the large banner at the top of your page) has something like: alt="Smiling customer at the counter of a family-owned bakery." Purely decorative images have an empty alt attribute (alt=""), which correctly tells screen readers to skip them.
Fail: The alt attribute is missing entirely, or it contains something like alt="image001.jpg" or alt="banner". An empty alt attribute on a meaningful image is also a failure.
Consequence: Screen readers read alt text aloud to blind users. A hero image with no alt text is invisible to those users. A missing alt attribute on a prominent homepage image is one of the most cited items in ADA demand letters. This is a WCAG 1.1.1 failure.
Step 4: Tab Through the Page Using Only Your Keyboard
Put your mouse aside. Press Tab to move forward through every interactive element on the page. Press Shift+Tab to go backward. Work through the entire homepage this way.
Pass: Every link, button, and form field is reachable by Tab. A visible focus indicator (a colored outline or highlight) appears around each element as you tab to it. You can reach the navigation menu, the hero CTA, the search bar, and any embedded form without touching the mouse.
Fail: Focus disappears when you tab past a certain point. No visible outline appears on links or buttons. A chat widget or cookie consent modal captures your Tab key so that pressing Tab keeps cycling within the modal and never lets you leave. That is a keyboard trap, a WCAG 2.1.2 failure, and a commonly cited lawsuit exhibit.
Consequence: Users who cannot use a mouse, including people with motor disabilities and many users of assistive technology, navigate entirely by keyboard. A keyboard trap on your homepage effectively locks them out of your site.
Step 5: Check Every Form Field for a Visible Label
Look at every form field on your homepage: search bars, email signup fields, newsletter inputs, contact forms.
Pass: Each field has a visible text label directly above or beside it that tells the user what to enter. Alternatively, the field has an ARIA label that a screen reader announces when the field receives focus.
Fail: Tab into a field and listen for what your browser or screen reader announces. If it says only “edit text” with no further description, the label is missing. Placeholder text inside the field (the grayed-out hint text that disappears when you start typing) does not count as a label.
Consequence: An unlabeled form field is inaccessible to screen reader users and many keyboard-only users. For a homepage email signup or search bar, that is a direct barrier to conversion, not just a compliance issue. This is a WCAG 1.3.1 and 4.1.2 failure.
Step 6: Verify the Heading Hierarchy
Your homepage should have exactly one H1, typically your main headline. Below it, major sections should use H2, and subsections within those should use H3. Heading levels should not skip: jumping from H1 directly to H3 is a failure.
Pass: One H1. H2s used for each major content section. Heading text that describes what follows, not generic labels like “Section 1.”
Fail: Multiple H1s. An H3 immediately after an H1 with no H2 in between. Bold or large text that looks like a heading but is marked up as a paragraph tag.
Consequence: Screen reader users navigate pages by heading structure. A broken hierarchy makes the page disorienting and can prevent users from finding the content they need. It is also a WCAG 1.3.1 failure that appears in automated scan results and accessibility audits.
You can verify this through your browser’s built-in accessibility inspector or through your scan results. Look for “heading structure” or “heading order” in the output.
Step 7: Check Links for Descriptive Text
Read every link on your homepage as if it were the only text on the page. Navigation links, inline text links, and any “read more” or “learn more” links all count.
Pass: Each link text tells you where it goes or what it does: “See our spring menu,” “Read the full case study,” “Contact our team.”
Fail: Links that say “click here,” “read more,” or “learn more” without surrounding context. Icon-only links (social media icons, an arrow icon) with no text or ARIA label.
Consequence: Screen reader users frequently navigate by pulling up a list of all links on a page. A list of “click here / read more / click here” is meaningless. This is a WCAG 2.4.4 failure and one of the six most common homepage failures identified by WebAIM.
Step 8: Check That Your Page Has a Language Attribute
Right-click anywhere on the page and select “View Page Source.” In the first few lines, find the <html tag and look for lang="en" (or your site’s primary language code).
Pass: <html lang="en"> or the appropriate language code is present.
Fail: <html> with no lang attribute.
Consequence: Screen readers use the language attribute to determine which language profile to use when reading the page aloud. Without it, pronunciation and reading behavior can be unpredictably wrong for users. It is a WCAG 3.1.1 failure and, critically, one of the simplest fixes on this list: one line of code.
How to Read Your Homepage Scan Results Without a Developer
Most business owners run a scan, see a report full of red flags and unfamiliar terminology, and close the tab. Here is how the output actually works.
Errors: Fix Now. These are confirmed WCAG failures. The scanner has detected a problem with certainty. Errors are what ADA demand letters cite. Treat them as your immediate priority list. Common examples on homepages: an image with no alt attribute, a form field with no label, a button with no accessible name, a page with no lang attribute. If you are comparing results across tools or have been using WAVE, WAVE Accessibility Checker Alternatives That Don’t Require Sign Up explains how different tools classify and display these tiers.
Warnings: Review Soon. These are likely failures that require human judgment to confirm. The scanner cannot be certain because the issue depends on context. A common warning: color contrast that is borderline, technically meeting the ratio but only barely, or with a font size that affects which ratio applies. Review warnings with your developer or designer at the next update cycle. They are not immediate legal emergencies, but leaving them unreviewed for months is a risk.
Notices: Monitor. These are informational flags. The scanner is pointing out something worth knowing, not citing a confirmed failure. A typical notice: a lang attribute that is present but could be more specific, or an ARIA role that is functional but could be improved. Notices are not lawsuit risks in isolation. Log them and revisit when you have bandwidth.
A useful benchmark from the 2025 WebAIM Million report: the average homepage has 51 distinct accessibility errors. If your scan returns fewer than ten errors and none of them are in the critical categories (missing alt text, missing form labels, keyboard traps), you are in materially better shape than most sites. If it returns thirty or more, prioritize the top five Errors before anything else.
How Often Should You Repeat This Checklist?
Check your homepage for ADA compliance any time you make significant content or design changes, and at minimum once every three months. Website updates introduce new accessibility errors. This is not a one-time exercise.
Specific triggers that should prompt an immediate re-check:
- Any homepage redesign or template change
- New images, videos, forms, or interactive sections added to the homepage
- A CMS or plugin update (WordPress plugins regularly alter heading structure, ARIA attributes, and focus behavior without obvious visual changes)
- Any changes made by a staff member, contractor, or agency who did not have accessibility on their checklist
The 2026 WebAIM Million analysis found that failures increased across the web despite years of gradual improvement. That pattern reflects exactly this dynamic: sites are updated constantly, and accessibility is rarely part of the update workflow.
Manual checks done quarterly give you a reliable baseline. For ongoing coverage between checks, automated monitoring tools can alert you when new errors appear, so you catch regressions before a user or plaintiff does.
Frequently Asked Questions About Homepage ADA Compliance
Do I need a lawyer or developer to check my homepage for ADA compliance?
No. You can run a free automated scan yourself in minutes and complete the manual keyboard and visual checks in this guide in under thirty minutes. A developer is needed to implement code-level fixes: adding alt text to images, labeling form fields, or fixing heading hierarchy. A lawyer becomes relevant only if you receive a demand letter or are named in a lawsuit. If you run an online store, the checklist extends beyond the homepage. Shopify Accessibility Compliance: Product Pages, Apps, and Checkout covers the specific risk areas for e-commerce flows.
Is my small business website required to be ADA compliant?
Yes, if your business is open to the public. ADA Title III applies to private businesses as places of public accommodation, and the DOJ has confirmed this extends to websites. There is no size exemption for small businesses. A five-person shop with a website faces the same legal exposure as a mid-sized retailer. There is no compliance deadline, but that means enforcement happens through lawsuits and demand letters, not a regulatory warning.
What happens if my homepage fails an ADA accessibility check?
In most cases, the first contact is a demand letter, not a filed lawsuit. Demand letters typically identify specific WCAG failures, request acknowledgment, and ask for a remediation timeline. Settlements for small business cases commonly range from $5,000 to $25,000 before legal costs. Responding promptly and documenting remediation efforts typically results in faster resolution and lower total cost than ignoring the letter.
Can an automated scanner make my homepage fully ADA compliant?
No. Automated scanners detect roughly 30 to 40% of detectable WCAG failures. They miss issues that require human judgment: whether alt text is meaningfully descriptive (not just present), whether heading text makes sense out of context, whether a video’s captions are accurate. Use the manual steps in this checklist alongside any automated scan. The combination gives you substantially better coverage than either approach alone.
Checking your homepage for ADA compliance is the fastest way to understand your current legal exposure. The scan gives you the Errors list. The manual checks give you the context to understand what those errors mean for real users. If your homepage has thirty-plus errors, you are not an outlier: you are the average. The difference is whether you know it.
This guide covers the highest-risk homepage issues. For a broader assessment, a full-site review goes deeper into interior pages, checkout flows, and document accessibility.
Run your homepage through the free ADA compliance checker to get your current error count and see which issues to address first.
This article is for general informational purposes and is not legal advice.
Related guides
ADA Website Compliance: The Complete 2026 Guide
ADA web lawsuits keep rising, and WCAG failures are the pattern behind them. See what compliance means, what breaks, and what to fix first.
Read: ADA Website Compliance: The Complete 2026 Guide